Category Archives: desserts and snacks

Outta the mouths (for the mouths) of babes!


recipeI found this recipe written by my 8 year old daughter sitting on the dining table this morning. Looks like she’s  on the way to a full fledged foodie like her Mom!

In case you can’t read it – here are her recipes (2 of them – she’s written more and came up with a delish veggie salad as well but that’s for another post)  – could be influenced by a recipe book – or more likely the Food Network, that kid loves any cooking show! Especially Chopped and Top Chef!


Crazy Cucumbers

  • thinly sliced cucumber
  • thinly sliced carrot
  • raisins
  • cream cheese
  • chives

Spread cream cheese on cucumber.  Add carrots and raisins.  Roll it all up and tie it with a chive.

Inside Out Sandwiches

Mini Me Foodie

Mini Me Foodie

  • breadstick
  • mustard
  • thinly sliced cucumber
  • thinly sliced red pepper
  • turkey slices

Spread mustard on turkey slice.  Add rest of ingredients, ending with the breadstick.  Roll it up. EnJoy


Like this recipe?  Let me know! Like this post and leave a comment!


Follow me on Twitter (joyskitchen) and Facebook (Joy In Your Kitchen).


Aside

This is a family favorite and its Gluten Free to boot!  Feel free to add (left over) cooked broccoli or bell peppers or other veggies to make it your own.  Super simple and delish – without all the processing that … Continue reading

Wow! Chocolate & (not Peanut) Butter Bars!


This is one of the recipes I use for a treat for the daycare I was catering at. The kids loved it! We had peanut & nut allergies so I used WOW! Butter for this recipe.  If there is no risk of allergy feel free to substitute real peanut butter for the WOW! Butter.  Best part – this is  a no cook recipe and only takes 5 min to prepare.

WOW! Butter & Chocolate Bars.

Wow Butter Bars (2)  wow butter bars

  • 1 cup  Syrup – I’ve used corn syrup or maple or table syrup
  • 3 cup Rice Krispies or Corn Flakes (or a mix of both)
  • 2 cup WOW! Butter or Peanut Butter
  • 2 squares of semi sweet chocolate

Mix first 3 ingredients in a bowl – please note all of these measurements are approximate as I actually just toss this stuff in together and mix it until its the consistency of rice krispy squares.  Add more or less of each ingredient until you get the right consistency.

Wow Butter Bars (3)Press into the bottom of a 8*10 pan (I line it with wax or parchment paper – so I can life the entire thing out to cut later).  Melt the chocolate for 30 seconds in microwave – and stir continue in 10 sec, spurts until melted (or melt in double boiler on stove top).  Spread on top of mixture in pan.  Cover with plastic wrap or a lid and refrigerate until the chocolate hardens (about an hour).  Lift out of pan using the parchment paper and cut into bars – freeze  or serve.  Keep in refrigerator,  freezes well.

enJOY.  Don’t forget to leave me a comment and like my post!

Aside

Tonight it was raining out. It was also hot, sticky and – all caps- HUMID so neither cooking in the oven nor on the grill for any length of time was appealing.  And,  I was home alone for supper, and … Continue reading

Snowmaggendon Ice Cream Sandwiches


Well we’ve managed to dig ourselves out of Snowmaggedon 2013 up here in Southern Ontario, Canada. Whew!  For once the weather guys were right – we actually got a snow storm! Friday was officially declared a snow day so we stayed inside (except when shoveling ha ha) and made treats.  What better to make on a snowy winter day to go with our hot chocolate or Mommy’s spiked coffee – Ice Cream Cookie Sandwiches! These ones we made Gluten Free but they can easily be made as normal cookies too.

Snowmaggedon Sandwiches

  • IceCream SandwichChocolate Chip Cookies (see recipe below)
  • Mint Chocolate Chip Ice Cream (or your fave)

Place a scoop of your fave ice cream in the middle of 2 cooled cookies.  EnJOY.

Gluten Free Chocolate Chip Cookies

  • 4 cup All Purpose Gluten Free Flour (I use a rice based blend)*
  • 4 cup Quinoa Flour*
  • 3 cup Butter or Margarine
  • 2 cup White Sugar
  • 4 cup Brown Sugar (packed)
  • 2 tsp Salt
  • 1/2 tsp baking soda *
  • 4 Eggs
  • 3 Egg yolks
  • 1/4 cup Vanilla
  • 6 cups Semi-Sweet Chocolate Chips or Chunks or 5 cup Melting Wafers

* If using regular all purpose flour (NOT gluten free) increase to 2 tsp baking soda and use 8 cups all purpose flour. 

In a mixer (or by hand) cream together sugars and butter. Add vanilla, and eggs (beaten), slowly add flours.  Add chocolate – I like wafers as they make bigger chunks.   Drop by spoonful onto an un-greased cookie sheet.  These will spread so place fairly far apart or be prepared to use your spatula to break apart.   Bake for 8-10 minutes, let cool on tray then remove to rack. Seat in airtight container.  Makes about 6 1/2 – 7 dozen.

You can also place parchment paper along the bottom & sides of a brownie pan and place he batter on it to make squares instead of cookies.  If you do so – add 5-7 min to cooking time (keep checking on it).  Let cool in pan, then use parchment paper to lift out of pan and a pizza cutter to cut into squares.  Seal in airtight container.  enJOY.

As always – I love hearing feedback!  Rate & leave me a comment and like this post so I know what y’all wanna hear about!

Visit my website at http://mealsfromjoyskitchen.com, follow me on Twitter and on Facebook!

Take me away to “Caramel” …. (Corn)


Longing to dash off to Carmel but stuck in a winter wonderland?  Try Caramel instead!  Here’s an easy-peasy quick pick me up for those Winter blahs….

Caramel Corn

Caramel Corn

  • ingredients in caramel 4 quarts/litres popped – popcorn (about 1 cup un-popped)
  •   1 cup dark brown sugar
  •   1/2 cup Corn Syrup
  •   1/2 cup butter (unsalted) or margarine
  • 1/2 tsp salt
  •   1/2 tsp baking soda
  •   1 tsp vanilla

ImagePop popcorn.  Spray a roasting pan with cooking spray – all the way up the sides (trust me this will help with clean up).

  • popped corn in roasterPlace popcorn in sprayed roaster.  Preheat oven to 250 – place roaster of popcorn in oven to remove any moisture from the corn, in oven while it heats.
  • caramel cookingWhile oven is heating, heat saucepan over medium heat, add brown sugar, corn syrup,  and butter (margarine), heat, stirring constantly to a boil  (less than 5 minutes – about 2 or 3 min).  Boil, without stirring for 5 minutes, remove from heat, stir in baking soda and vanilla.

ImageRemove popcorn from oven, pour caramel over corn and mix with a rubber spatula or wooden spoon until coated.  Place back in oven – uncovered for 45 minutes, stirring every 10 or 15 minutes.

Caramel Corn CoolingTo cool, spray some parchment paper with  cooking spray, and pour corn on top, it will be ready to eat in a few minutes!

**Very important – store in air tight container immediately (no really, that’s only if you are like me & the kids and will grab a handful every time you walk through the kitchen.

enJOY!

As always – don’t forget to like my blog and comment!  Visit my business site at http://mealsfromjoyskitchen.com. Follow me on Twitter (joyskitchen) and like me on Facebook (biz page – Joy In Your Kitchen).

Pumpkin Up Your Soup & Snacks


With the arrival of October and the cooler weather,  so comes pumpkins.  Pumpkins aren’t just for Pumpkin Pie (although a great use for it!), and for (Canadian) Thanksgiving, they are loads of fun for carving – and of course roasting the seeds!  I’ve also included a soup recipe that you may not typically think of, but really highlights some of the fall veggies.  This soup is thick and creamy without containing dairy (coconut milk is used in place of cream) and although I made this with home-made turkey stock (from the Thanksgiving bird), you could certainly substitute veggie stock and make it a vegan dish as well!   I’ve also highlighted my families favorite ways to roast pumpkin seeds with a few variations as well!  So visit your local farm or farmers market before they close for the season & enJoy!

Sweet Potato-Squash & Pumpkin Soup

  • 1 large (or 2 small) sweet potato
  • 1 med acorn squash
  • 3/4 can pumpkin puree or a small pumpkin
  • 1 litre (approx 4 c) coconut milk
  • 1 litre (approx 4 c) chicken stock (or veggie stock)
  • 1 lemon’s juice (or about 1.5 tsp lemon juice concentrate)
  1. Heat oven to 400 degrees.  Cut squash and pumpkin (if using) in half and scoop out the seeds (keep them pumpkin seeds for roasting!). Wash the sweet potato. Place the pumpkin and squash face down on a cookie sheet with a lip (you may want to spray it with EVOO first to keep them from sticking) and add a bit of water to the bottom of the tray. Cover with tinfoil.  Place the tray in the oven along with the sweet potato(es). Bake for about 45 min – 1 hr or until a knife goes in without resistance.
  2. Remove the skin(the meat of the veggies will be very soft) by scooping the insides out and into a large 4 quart pot.   Mash together.
  3. Heat, add lemon juice.  Add the coconut milk a little at a time until mixed in. Add the stock.  Add black pepper to taste. Simmer for 30 minutes – serve & enJOY

Best Roasted Pumpkin Seeds

Scoop out pumpkin seeds from large pumpkin.  Rinse in a colander to get some of the “pumpkin guts” off. Lay out on a cookie sheet for 24 hrs to dry out (or else you will need to increase cooking time – we let them dry out over night – about 14 hrs and then roasted them for about 1.5 hr).  Once they have dried out, you can pick any of the left over “guts” off more easily.

Drizzle some sesame oil (about 1-2TB dependent on how many seeds you have), and mix it with the seeds. Sprinkle sea salt and mix.  Place in 300 degree oven for about an hour, stirring 1 or 2 times.  Let cool (if you can wait!) and enJOY!

some of our fave variations:

  • use melted garlic butter instead of sesame oil.
  • After removing from oven, sprinkle with a little sugar as well as salt for a sweet & salty snack.
  • Forgo the salt and use black pepper instead.
  • Use onion, garlic or seasoning salt instead of sea salt.
  • Add 1 tsp cumin when roasting.

I love hearing from you! Please add your comments and like my blog! Want more?  Visit my website at http://mealsfromjoyskitchen.com

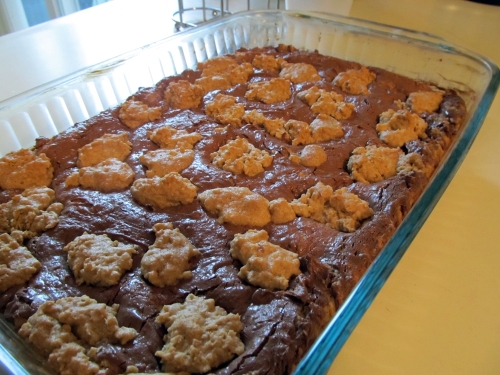
(Gluten) Free yourself with Peanut Butter Chocolate Cookie Bars!


Really – is there anything better than peanut butter and chocolate? Answer – YES! Mix it with rolled oats and bake it into cookie bars Oh, ya its gluten free too! woot woot!

Lets get to it!

Gluten Free Peanut Butter -Chocolate Cookie Bars

  • 1 cup milk chocolate chips
  • 2/3 cup peanut butter – (creamy)
  • 1 cup packed brown sugar
  • 1 egg
  • 1 tsp vanilla
  • 1/2 cup butter (salted) – softened
  • 3/4 cup flour (I use all purpose gluten free flour (rice))
  • 1 , 1/2 cup rolled oats
  • 1/2 tsp baking soda

grease 9X13 glass pan – set aside.  Preheat oven to 350 degrees.

Melt chocolate in glass dish in microwave for about 1 min, stir then nuke i for another 15 seconds – stir until smooth. (you may need to nuke it for another 10 seconds).   Set aside.

Blend together (I used my stand up KitchenAid) butter, peanut butter and brown sugar until blended and smooth.  Add egg (beaten), and vanilla. Continue beating, add flour & baking soda.  Stir in rolled oats.

Place in bottom of pan, and make a “layer”.  (Optional reserve 1/4 of batter for top). Pour chocolate on top and smooth into another layer.  If using option – dot the top with the rest of the batter.  Bake at 350 (uncovered) for 24-26 minutes. Let cool. * This recipe is better once totally cooled rather than still warm. enJoy.

I love hearing your feedback and comments!


Holy Fishcakes its Friday!… or Tues…Weds..Thurs..


Fishcake Friday … ok, so its not Friday but these are great to make ahead of time and freeze, and serve with a salad for a nice light supper, or make into smaller fishcakes and serve as app’s at your next get together (or movie night with the family!).    I started off using this recipe and morphed it to our tastes and what I had on hand.  The result was delish! Next time I would add a little Dijon Mustard as well.   If you don’t care for catfish or basa, you can pretty much substitute any mild fish, salmon, or crab meat into this recipe.  These were way easy to make and will now be a “go to” for easy peasy appy dinners!

Cajun Fishcakes

Ingredients

Boil potatoes in slightly salted water. While the potatoes are boiling, heat a deep frying pan to med high (heat it first before adding ingredients – this will allow your food to cook more evenly).

Add a bit of oil and the fish, cook for 3-4 min per side or until done.

Remove fish from pan, add to bowl, break up with fork.  Add bread crumbs, add seasonings.  Potatoes should be finished boiling – turn off burner, drain potatoes, put back into hot pan to burn off any excess water.  Mash potatoes, add milk (may need a little more),- this is where I would add  some Dijon Mustard next time – add egg to potatoes and stir until blended.

Add to fish mixture. Stir. Heat the fry pan again. Add a little bit of oil for frying. Form into balls and flatten a little, add to hot oil, fry for 2-3 min per side until golden brown. Drain or pat with paper towel.  You can also try spritzing the balls with oil, then broiling or baking (450) instead of frying.  We serve drizzled in remaining 1/2 lemon’s jucie, topped with slices of lemon (or try fancy’n it up with some lemon zest inside or on top of the cakes!), a big salad and homemade tartar sauce.  enJOY.

In-A-Minute Tartar Sauce

  • 1/4  cup mayo
  • 2-3 tsp green relish (hamburger relish)
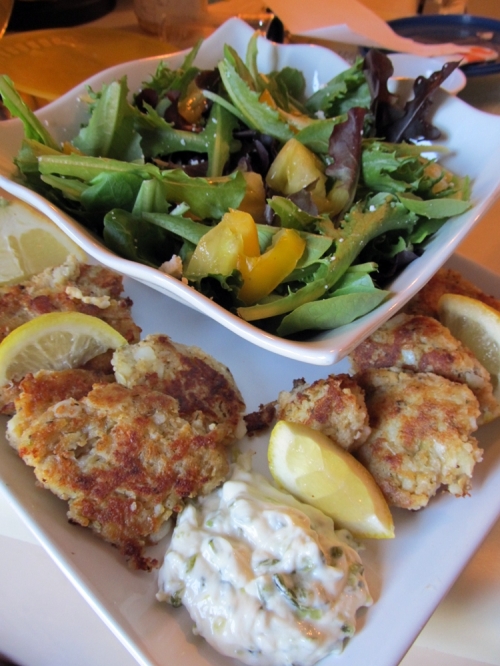
Mix and let sit for 5 minutes. Serve with fish.

Don’t forget to like my post and leave me a comment! Follow me on Twitter and Facebook!

Aside

I did it! A few days ago I posted about a recipe that I came across for Peach Crisp made out of a cake mix and stated that although the recipe didn’t thrill me  – the fact that 111 people … Continue reading